
What is an APN, why does it matter?
An APN (Access Point Name) is the gateway configuration that tells your cellular module which network path to use when connecting to the internet or a private data network. Think of it as the “address” your device hands to the carrier to establish a data session. It determines routing, IP assignment, and in many cases, what security policies apply to your traffic.
APNs exist because carriers need to route data traffic to different destinations: a consumer browsing social media, a fleet vehicle reporting GPS, and a medical device uploading readings all have very different requirements – and the APN is how the network tells them apart.
In IoT deployments, leaving the APN on auto-detect is a common mistake. Manually setting it ensures your device consistently connects to the right context, especially critical when using IoT SIMs, private APNs with fixed IPs, or roaming SIMs where auto-selection can land you on a suboptimal or even incorrect bearer. A wrong or missing APN means no data, silent failures, and hours of debugging that could have been avoided with a single AT command.
How to set “my APN” in a cellular module?
By default, cellular modules come without a pre-defined APN (Access Point Name). It is however best practice to set this to the correct value to tell the module how to get online
Via AT commands:
Check if any APN is set:
AT+CGDCONT? // Query APN
+CGDCONT: 1,"IPV4V6","","0.0.0.0.0.0.0.0.0.0.0.0.0.0.0.0",0,0,0,0,,,,,,,,,,"",,,,0
To set an APN:
AT+CGDCONT=1,"IP-VERSION","YOURAPN"Example:
AT+CGDCONT=1,"IPV4V6","techship.com" // Set APN
OK
AT+CGDCONT? // Query APN
+CGDCONT: 1,"IPV4V6","techship.com","0.0.0.0.0.0.0.0.0.0.0.0.0.0.0.0",0,0,0,0,,,,,,,,,,"",,,,0
AT+CFUN=1,1 // Restart the module for settings to take effect
Via Windows GUI:
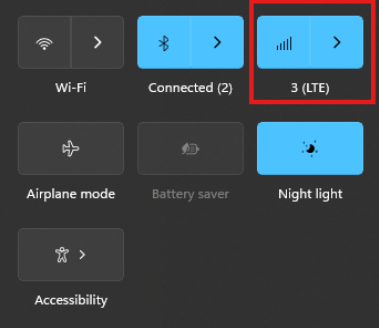
The connection manager settings and controls can be found and accessed on Windows desktop start menu through the network icon (see picture)
The Cellular tab can be found in Windows system settings and the connection APN details can be manually entered through “Advanced options”
Via Linux ModemManager/NetworkManager:
Using NetworkManager and ModemManager in Linux to automatically establish a connection and configure IP details
In this article we will show how to set up NetworkManager to automatically configure, establish the cellular data connection in your system.
NetworkManager and ModemManager are open source tool for Linux to manage several types of networks and interfaces such as ethernet, wifi, etc. It can also manage cellular WWAN interfaces through the ModemManager tool.
It is hosted by the Freedesktop.org community and driven by Aleksander Morgado and other contributors. please visit https://wiki.gnome.org/Projects/NetworkManager and https://www.freedesktop.org/wiki/Software/ModemManager/ for latest information, source code, API reference manuals, debugging tips, contribution, mailing list etc.
ModemManager is capable of communicating over several types of device control channels such as QMI/RMNET, MBIM, MODEM / AT command etc. But support for vendor proprietary or out-of-kernel drivers are none or very limited. Such drivers are gobinet, simcom_wwan and other drivers provided by the vendors directly.
Many Linux distributions have NetworkManager and ModemManager pre-installed or they can typically easily be installed through the systems package manager.
In Ubuntu for example apt can install it for you by command if not already installed:
apt install network-manager
Check with commands below that you have both tools installed in system and their versions.
NetworkManager -V
ModemManager -V
ModemManager (and NetworkManager) are continuously developed for better compatibility with the cellular devices, therefore it is recommend to use a recent version of the tools and in case of problem situations, evaluate the latest versions from source and check the mailing list archives for possible discussions on the problem experienced.
Keep in mind that NetworkManager and ModemManager projects are not directly developed or driven by the cellular device vendors and the compatibility with the device you aim to use can be limited. Some vendors contribute with code to make their devices fully compatible, while others don’t. Many cellular devices can be set to expose standardized types of USB network interface and control channel such as MBIM interface by USB-IF or the Qualcomm proprietary interface QMI that ModemManager will try to identify, and often manage to work successfully with but there are exceptions also.
Both NetworkManager and ModemManager have command line interfaces (nmcli and mmcli respectively) where you can interact with the management tools.
Have ModemManager list all the cellular device it has detected. Here we use the Alcatel IK41 series with MBIM interface in this example:
mmcli –list-modems
/org/freedesktop/ModemManager1/Modem/0 [Alcatel] Mobilebroadband
General details and status of them modem can be listed with “–modem” option.
mmcli –modem=0
—————————–
General | dbus path: /org/freedesktop/ModemManager1/Modem/0
| device id: 998e478c5b14c75e16bffe6abaacabef22fb2f5b
—————————–
Hardware | manufacturer: Alcatel
| model: Mobilebroadband
| firmware revision: MPSS.JO.2.0.2.c1.7-00004-9607_
| carrier config: default
| h/w revision: 0
| supported: gsm-umts, lte
| current: gsm-umts, lte
| equipment id:
—————————–
System | device: /sys/devices/pci0000:00/0000:00:14.0/usb3/3-1
| drivers: option1, cdc_mbim
| plugin: Generic
| primary port: cdc-wdm0
| ports: cdc-wdm0 (mbim), ttyUSB0 (at), ttyUSB2 (at), wwan0 (net),
| ttyUSB1 (qcdm)
—————————–
Status | lock: sim-pin
| unlock retries: sim-pin (3)
| state: locked
| power state: on
| signal quality: 0% (cached)
—————————–
Modes | supported: allowed: 2g; preferred: none
| allowed: 3g; preferred: none
| allowed: 4g; preferred: none
| allowed: 2g, 3g; preferred: 3g
| allowed: 2g, 3g; preferred: 2g
| allowed: 2g, 4g; preferred: 4g
| allowed: 2g, 4g; preferred: 2g
| allowed: 3g, 4g; preferred: 3g
| allowed: 3g, 4g; preferred: 4g
| allowed: 2g, 3g, 4g; preferred: 4g
| allowed: 2g, 3g, 4g; preferred: 3g
| allowed: 2g, 3g, 4g; preferred: 2g
| current: allowed: 2g, 3g, 4g; preferred: 2g
—————————–
Bands | supported: egsm, dcs, pcs, g850, utran-1, utran-8, eutran-1, eutran-3,
| eutran-7, eutran-8, eutran-20, eutran-28
| current: egsm, dcs, pcs, g850, utran-1, utran-8, eutran-1, eutran-3,
| eutran-7, eutran-8, eutran-20, eutran-28
—————————–
IP | supported: ipv4, ipv6, ipv4v6
—————————–
SIM | dbus path: /org/freedesktop/ModemManager1/SIM/0
Check that the cellular device is managed by NetworkManager by not having state “unmanaged” listed for it.
nmcli device status
DEVICE TYPE STATE CONNECTION
cdc-wdm0 gsm disconnected —
enp3s0 ethernet unmanaged —
lo loopback unmanaged —
Now you should create a connection profile in NetworkManager for your specific network carrier and SIM card with the “nmcli connection add” command:
For example:
nmcli connection add type gsm ifname ‘*’ con-name ‘3-sweden’ apn ‘data.tre.se’ connection.autoconnect yes gsm.pin 0000
– type is gsm for all typical cellular connections unless it is of cdma type.
– ifname is the control interface name, in this case cdc-wdm0, wildcard can be used also to have it autoselect.
– con-name is the profile name you want to give it.
– apn is provided by your network carrier and tells the modem what attach point it should use for the data connection.
– connection.autoconnect set to yes will make NetworkManager always try to auto connect and maintain this profile connection.
– gsm.pin lets you provide a pin code for the SIM card, that NetworkManager will try to use if PIN check is enabled for SIM card.
There are several additional commands and attributes available such as username and password settings for the APNs etc. Refer to the NetworkManager help and manual pages for full details on the commands.
If successful you should receive a reply similar to this one:
Connection ‘3-sweden’ (cad6fcbf-2cb1-4796-b7e6-67b9f9635aef) successfully added.
You can check the status now by command:
nmcli device status
DEVICE TYPE STATE CONNECTION
cdc-wdm0 gsm connected 3-sweden
enp3s0 ethernet unmanaged —
lo loopback unmanaged —
Where connected should be listed as state if the connection establishment was successful.
If the connection is not successful or you want more details about the device and connection you can check commands:
You can list the current status with command:
nmcli radio
WIFI-HW WIFI WWAN-HW WWAN
enabled enabled enabled enabled
nmcli device show cdc-wdm
GENERAL.DEVICE: cdc-wdm0
GENERAL.TYPE: gsm
GENERAL.HWADDR: (unknown)
GENERAL.MTU: 1500
GENERAL.STATE: 100 (connected)
GENERAL.CONNECTION: 3-sweden
GENERAL.CON-PATH: /org/freedesktop/NetworkManager/ActiveConnection/18
IP4.ADDRESS[1]: 2.68.73.130/30
IP4.GATEWAY: 2.68.73.129
IP4.ROUTE[1]: dst = 2.68.73.128/30, nh = 0.0.0.0, mt = 700
IP4.ROUTE[2]: dst = 0.0.0.0/0, nh = 2.68.73.129, mt = 700
IP4.DNS[1]: 80.251.201.177
IP4.DNS[2]: 80.251.201.178
IP6.ADDRESS[1]: 2a02:aa1:1017:6d11:1060:3dff:feac:e92f/64
IP6.ADDRESS[2]: 2a02:aa1:1017:6d11:6474:7254:7b72:eb09/64
IP6.GATEWAY: 2a02:aa1:1017:6d11:21e6:9049:6cfb:8ac3
IP6.ROUTE[1]: dst = ff00::/8, nh = ::, mt = 256, table=255
IP6.ROUTE[2]: dst = 2a02:aa1:1017:6d11::/64, nh = ::, mt = 700
IP6.ROUTE[3]: dst = ::/0, nh = fe80::21e6:9049:6cfb:8ac3, mt = 1024
IP6.ROUTE[4]: dst = 2a02:aa1:1017:6d11::/64, nh = ::, mt = 256
IP6.ROUTE[5]: dst = ::/0, nh = 2a02:aa1:1017:6d11:21e6:9049:6cfb:8ac3, mt = 700
IP6.DNS[1]: 2a02:aa0::55
IP6.DNS[2]: 2a02:aa0::56
nmcli connection show
NAME UUID TYPE DEVICE
3-sweden e946017f-2e9c-477b-89ad-4c31e7331d65 gsm cdc-wdm0
Ifconfig should now show the related IP address details already set to the network interface by NetworkManager:
ifconfig
wwan0: flags=4291 mtu 1500
inet 2.68.73.130 netmask 255.255.255.252 broadcast 2.68.73.131
inet6 2a02:aa1:1017:6d11:6474:7254:7b72:eb09 prefixlen 64 scopeid 0x0
inet6 2a02:aa1:1017:6d11:1060:3dff:feac:e92f prefixlen 64 scopeid 0x0
ether 12:60:3d:ac:e9:2f txqueuelen 1000 (Ethernet)
RX packets 186 bytes 10886 (10.8 KB)
RX errors 0 dropped 0 overruns 0 frame 0
TX packets 5 bytes 480 (480.0 B)
TX errors 0 dropped 0 overruns 0 carrier 0 collisions 0
You can now for example test the connection over the network interface by sending ping requests.
Testing IPV4 connection:
ping -4 -I wwan0 8.8.8.8
PING 8.8.8.8 (8.8.8.8) from 2.68.73.130 wwan0: 56(84) bytes of data.
64 bytes from 8.8.8.8: icmp_seq=1 ttl=118 time=55.8 ms
64 bytes from 8.8.8.8: icmp_seq=2 ttl=118 time=45.4 ms
64 bytes from 8.8.8.8: icmp_seq=3 ttl=118 time=42.9 ms
— 8.8.8.8 ping statistics —
3 packets transmitted, 3 received, 0% packet loss, time 2003ms
rtt min/avg/max/mdev = 42.918/48.053/55.845/5.601 ms
Testing IPV6 connection: (if your cellular device, network subscription and APN supports it)
ping -6 -I wwan0 2600::
PING 2600::(2600::) from 2a02:aa1:1017:6d11:1060:3dff:feac:e92f wwan0: 56 data bytes
64 bytes from 2600::: icmp_seq=1 ttl=46 time=172 ms
64 bytes from 2600::: icmp_seq=2 ttl=46 time=171 ms
64 bytes from 2600::: icmp_seq=3 ttl=46 time=169 ms
64 bytes from 2600::: icmp_seq=4 ttl=46 time=168 ms
— 2600:: ping statistics —
4 packets transmitted, 4 received, 0% packet loss, time 3004ms
rtt min/avg/max/mdev = 167.921/170.037/172.272/1.651 ms
The connection is successful and automatic reconnect is working when testing to unplug and plug in the device again.
For additional configurations, commands and available attributes, please relate to the manual pages for NetworkManager and ModemManager.
Troubleshooting logs:
NetworkManager and ModemManager write log messages to the Linux syslog file /var/log/syslog.
In case of problems with establishing a cellular data connection, please copy the logfile after the problem have appeared and include it in a Techship technical support ticket.
In some situations more detailed debug logs are needed, these can be acquired by changing the log levels for NetworkManager and ModemManager and run them manually.
To capture debug logs, please first disable and stop the normal services:
systemctl stop NetworkManager ModemManager
systemctl disable NetworkManager ModemManager
Run them manually in background with debug level set:
/usr/sbin/ModemManager –log-level=DEBUG &> /dev/null &
/usr/sbin/NetworkManager –log-level=DEBUG &
Reproduce the cellular data connection problem.
Once completed, kill the processes:
killall -TERM NetworkManager ModemManager
Copy the relate messages in syslog to a mm-nm-sys-debug.log logfile:
grep -E ‘ModemManager|NetworkManager|systemd|dbus-daemon|dhclient’ /var/log/syslog > mm-nm-sys-debug.log
Activate and start the services again:
systemctl enable NetworkManager ModemManager
systemctl start NetworkManager ModemManager
Include the mm-nm-sys-debug.log in a technical support ticket at Techship.com where you describe the issue in details and include other relevant information also such as kernel version, ModemManager and NetworkManager versions, dmesg log etc.